Sandustry Factory Blueprints Guide
Proven factory layouts, automation patterns, and modular designs from the community — copy what works and adapt to your save.
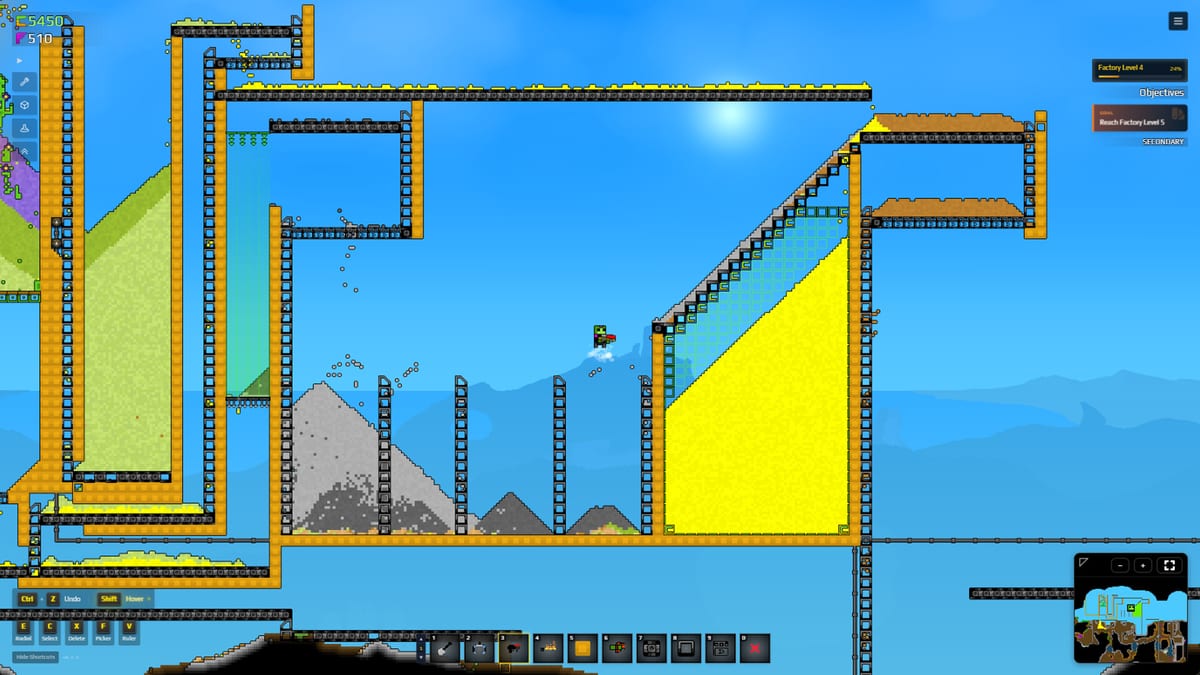
A factory blueprint in Sandustry is a tested layout that converts inputs into outputs reliably. Unlike grid-locked games where belts run on fixed tracks, Sandustry blueprints must survive pixel physics — every design is a hypothesis until sand flow confirms it works. This guide collects community-tested blueprints and the design principles behind them so you can copy proven patterns and adapt them to your save.
Why blueprints matter in Sandustry
Sand physics makes every factory a living experiment. A layout that works on paper can jam when Wet Sand piles behave differently than expected, when Slag settles in unexpected places, or when Lava cools mid-pipe. Blueprints in this guide are starting points tested by the community — they are not guarantees, but they reflect layouts that have survived real physics runs.
Core design principles
Clear flow direction
Every blueprint should have a visible input-to-output path. Sand flows downhill, liquids pool at the lowest point, and Gold drops when Shakers vibrate. Design your layout so materials move in natural directions rather than fighting gravity or expecting pixels to climb.
Modular sections
Divide your factory into specialized zones: a wetting station, a shaker bank, a slag processing line, and an overflow buffer. Each module should work independently so you can troubleshoot one section without dismantling the whole factory.
Overflow paths
Sandustry production varies. Shakers do not output at perfect intervals, and material piles can grow unexpectedly. Every blueprint should include overflow paths — routes that handle excess materials without jamming primary production.
Service access
Leave inspection space between modules. You need room to click filters, clear jams, and add bypass channels when a section misbehaves. A blueprint that looks efficient but offers no service access becomes a maintenance nightmare.
Expansion space
Design for growth. Your first shaker line should leave room for a second row. Your slag burner should have a clear upgrade path to a press line. Blueprints that assume maximum efficiency from day one rarely survive the first redesign.
Starter factory blueprint
The simplest working factory:
- Water source — Lake or snow-fed pipe at the top
- Wetting pool — Flat area where Sand absorbs Water
- Conveyor feed — Single belt carrying Wet Sand to shakers
- Diagonal shaker row — Three to five shakers on a diagonal
- Gold collector — Container directly below shaker drop points
- Slag conveyor — Belt routing slag to burner
- Burner — Flamethrower or lava channel processing slag
This layout fits on a small map and teaches the core loop. Scale by adding parallel shaker rows rather than extending a single row.
Gold farm blueprint
Optimizing for Gold production:
- Input rate — Match Wet Sand delivery to shaker count; do not starve shakers
- Diagonal placement — Shakers must face the correct direction for Gold to separate
- Collector positioning — Gold collectors must be directly below the drop zone
- Slag routing — Route slag to a dedicated burner rather than piling it
- Refining bonus — Once Refining 2 unlocks, add a Kinetic Slag Press for second-income Gold
Slag processing blueprint
The full slag line:
- Slag conveyor — Move slag from shakers to heat source
- Burner — Flamethrower or lava bath converting slag to Burnt Slag
- Press input — Conveyor feeding Burnt Slag to Kinetic Slag Press
- Press output — Gold and Spores from press collection
- Overflow buffer — Storage for times when press is overwhelmed
Filter-based separation blueprint
Using density differences to sort materials:
- Mixed input — Route mixed piles to filter input
- Filter chain — Multiple filters in sequence exploiting density gaps
- Collection bins — Separate containers for each separated material
- Feedback loop — Re-process overflow back through filters
Filters work best when you understand the density chart: Sand < Wet Sand < Slag < RedSand < Lava < Gold.
Automation patterns
Conveyor belt scaling
Start with single belts; upgrade to parallel belts only when a single belt chokes. Premature parallelization wastes materials on split conveyors.
Drone logistics
Use drones for vertical transport and long horizontal distances where conveyors would require heroic bridge building. Drones shine in deep mines where vertical drop beats belt length.
Pipe networks
Keep pipe networks simple. Each pump adds a potential failure point. Design pipes to use gravity where possible and minimize pumping requirements.
Blueprint sources and community sharing
The Sandustry community shares blueprints through Steam Workshop, Discord servers, and dedicated blueprint sites like SandustryVault. When copying community blueprints, verify they match your current game version — patch changes can invalidate old designs.
Related pages
- Guides Hub — Overview of all guide content
- How to Get Gold — Shaker optimization for maximum gold yield
- Slag Processing — Full slag line mechanics
- Automation Basics — Conveyor and drone logistics
- Buildings — Shakers, Filters, and Conveyors in detail
- Research Priority — Unlock order for blueprint expansion
Frequently Asked Questions
Quick answers to the most common Sandustry questions.
How do I design a working Sandustry factory blueprint?
Start with clear flow direction, modular sections, overflow paths, and expansion space. Copy proven starter layouts first, then adapt to your save's physics.
Why do my shakers not producing gold?
Ensure shakers are placed diagonally with the correct facing direction. Gold collectors must be directly below drop points. Check that Wet Sand is actually reaching the shakers.
What is the best starter factory layout?
A simple loop: water source → wetting pool → diagonal shakers → gold collector + slag burner. Keep it small and learn the physics before scaling.
How do I handle slag overflow?
Design overflow paths that route excess slag to storage rather than piling on your main line. A dedicated burner with buffer space prevents jams.
Where can I find community blueprints?
Steam Workshop, Discord servers, and blueprint sites like SandustryVault share community designs. Always verify they match your game version.